

Saturday, 31 March 2012
Making Science fun!
I mentioned a few weeks ago I was attending a family learning Science course at my eldest children's school, the course aimed to make science fun and engaging for both adults and children, and having parents there learning along side the children is a great way to focus attention and encourage them to take an interest.
The course ran for 6 weeks and we all really enjoyed it, we did plenty of fun experiments simple things which made us look at how science is present in so much daily life and it can be fun to see what makes things work the way they do.

Now the family learning course has finished, and it the Easter Break I was really happy to be offered a Wild Science Hyperlauncher Rocketball activity kit to review, perfect timing to keep our spark for science going through the holiday.
This kit is aimed at 8 year olds and above, however my 4 year old managed to join in with my supervision.

The idea of this kit is that you get to learn about inertial energy, and elastic collisions, or to those with less scientific terminology - you get to make and see what makes bouncy balls bounce, and how momentum and force effects movements!

This is a bright coloured box which instantly grabbed the attention of all three of my children. Inside the box you are greeted with everything you need to complete the experiments, the only additional thing you will need is a bowl of water.

There are several tubs of crystal powder, 4 different sized moulds, some plastic rods, and the all important scientific goggles!
The instruction booklet, is beautifully illustrated with the same appealing colourful designs as on the box, the simple instructions make it easy enough for older children to follow alone.

Making the balls themselves seemed to be the fun part for all three of my children,The simple instructions meant they could all be included with no need for too much help from me. Included in the kit is several colour crystal option including a glow in the dark variety, so picking the colours of the balls was part of the fun.

Then putting them under the water before taking the moulds off and hoping the balls were correctly formed.

We only had one which didn't hold together as expected (I think we were a little eager to remove them from the water) But all others worked perfectly well, and there is plenty of crystals to make several sets of balls.

Once the balls were all made, the children happily used them as suggested in the instructions, watching how the balls reacted to being dropped when all connected on to the 'hyperlauncher' watching as the small ball bounced off the rod leaving the others remaining, we talked about the law of motion and they changed the order of the balls on the hyperlauncher to see what happened then.

The children loved making their very own bouncy balls, and after playing with the 'hyper launcher' they enjoyed simply bouncing the balls between themselves and making them glow in the dark.
Overall this is a really fun kit, simple and easy to use, with very little mess and older children can mange successfully alone with ease, younger children can enjoy this kit too with a bit of adult supervision.
The end output is great, so no disappointment caused and there is plenty of options to include lots of educational talk and scientific knowledge making learning whilst having fun easy.
There are other sets in the wild science range including disgusting slime experiments and real life worms, or slightly less gruesome kits such as bath bomb sets or cosmetic kits to inspire girls everywhere to take an interest in science
Wednesday, 28 March 2012
The Gallery : Extreme Close Up
Today Tara over at Sticky fingers has a really great prompt... close ups!

I hardly ever use my macro settings on my camera, I am far more a point and shot and hope for the best sort of photographer, but I caught sight of this prompt just before I rushed off out to get my three from school this afternoon, on returning home in the glorious sunshine they quickly grabbed their shorts and T shirts and demanded we take Jackson to the local fields, so I grabbed my camera and off we went.

Once there my eldest two ran off with some friends to play ball, I sat with my youngest and Jackson and took the opportunity to get some snaps perfect for todays Gallery!
 But it wasn't long before Mikey ran off to join the others so Jackson become my subject.
 Luckily for me he is very Photogenic.

and when he was bored of me putting my camera in his face I took this of my jeans

and this of the new buds.

I love the macro on my camera and should use it more often!
Now pop on over to Sticky Fingers to see all the other entries!

I hardly ever use my macro settings on my camera, I am far more a point and shot and hope for the best sort of photographer, but I caught sight of this prompt just before I rushed off out to get my three from school this afternoon, on returning home in the glorious sunshine they quickly grabbed their shorts and T shirts and demanded we take Jackson to the local fields, so I grabbed my camera and off we went.

Once there my eldest two ran off with some friends to play ball, I sat with my youngest and Jackson and took the opportunity to get some snaps perfect for todays Gallery!


and when he was bored of me putting my camera in his face I took this of my jeans

and this of the new buds.

I love the macro on my camera and should use it more often!
Now pop on over to Sticky Fingers to see all the other entries!
Monday, 26 March 2012
The simple things..
I love the simple things in life, I make no secret of taking great pleasure from the mundane things, watching children laugh whilst mid water fight on a sunny afternoon, enjoying the beautiful countryside, making your own fun with the wonders of nature really do please me.

I also make no excuses for keeping the chores to a minimum, if there is a way to save a few minutes and not have to iron something then I'm all for it, so you would think household appliances were on the top of my must have lists, they at the end of the day all boast to make our lives that much simpler and speedier don't they?
But I am seriously lacking in the appliance market, I somehow have ended up with very few appliances in my house that save me any time at all, and the only appliances I own have been lovingly handed to me from my Gran.
I don't have a microwave or dishwasher, I don't have a fancy food processor to whip up a treat or a steam cooker to make the vegetables that bit tastier, in fact the most high tech kitchen appliance I have is the kettle which has certainly seen better days but with the amount of Tea we consume it is a simple must have!

I sometimes wonder whilst chopping and mixing by hand if my bland meals could be rejuvenated with the power of modern appliances, maybe then we would be treated to culinary masterpieces instead of my signature meat and two veg, surely even if my kitchen skills didn't improve, time at least, could be saved by owning some of the must have mod cons.

But its not just in the kitchen I'm lacking in fancy appliances, I spend far too long on my hands and knees with the trusty dustpan and brush whilst I ponder if having a sparkling high tech hover would enable me to cross from the rug to the laminate with ease, maybe the old hoover my gran gave us has seen better days and my house cleaning time could be halved with an all singing all dancing modern equivalent?
Even my iron looks a little past its prime it certainly has no fancy features to make me want to use it, with no tumble drier either I pick clothes on their ability to not crease rather than their fashion presence!

I guess I have never really given enough time or thought to the luxuries available, domestic disasters have become almost the norm, making do with the bits and pieces I have, taking no doubt twice as much time in my over stretched day to complete the simplest of tasks that could become so much more fun and convenient with a bit of upto date technology.
So, whats your must have appliance... what one thing would you not give up, which should be high on my priorities list?!
I'm entering this post into the Tots100 Morphy Richards Innovators wanted competition, to be in with a chance to get my hands on some brand new appliances to see what I'm missing!
Saturday, 24 March 2012

Selective Colour Removal : Google+
As many people will know, I am a fan of Picnik.com the photo editing site and I was devastated when google announced they were to close this amazing photo editing software in April 2012
They told all users to find the edits available on Google+ but I was reluctant to go over to Google+ to try them, I find Google+ very confusing, and I don't really have the time or inclination to suss it out.
But with April 19th drawing closer and not being able to find a simple free photo editor to the same standard as Picnik anywhere I thought I best go and check out what Google + has to offer.
I logged into My account and fumbled around for a while, then eventually found the creative kit, and it is indeed very similar to the much loved Picnik. There are a few differences, no frames as yet and a couple of the other options are unavailable, but Google did promise they would be making the editing features even better in Google Plus so we'll have to wait and see.
Whilst I did not want to be forced into using Google+ it does seem that it may be workable.
There are several features to beable to make your photos private or to share them with your circles, you can also download the edited photos to your computer easily.
So seems as one of the most popular tutorials I made for Picnik was how to get selective colour removal, I have put together this run through for Google +

Those of you who loved and were familiar with Picnik will find it very straight forward once you have worked out how to upload photos into the creative kit.
Ok so Start off by logging into Google+ and you will be greeted with the following screen, along the top there are a set of little icons, one resembling a house, another a photo etc (to see any of the photos in this tutorial larger please click on them)

To upload a photo onto google+ click on the photo icon as shown above and you will be brought to a page where you can view your albums or create a new album and upload photos from your phone or computer, down the left hand side you will see the option to view your albums as highlighted below.

If you wish to upload a new photo select Upload New Photos, from the top right corner as highlighted above.
Then you will see the upload box, where you can select the name of the album you wish to create, or select to add photos to an existing album

Once you have uploaded your photos, and you can see them in your album list, click on the photo you wish and it will be displayed bigger,
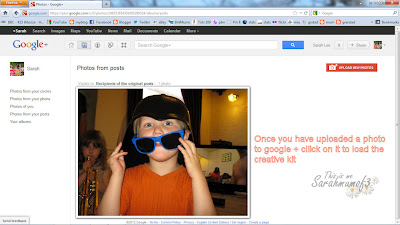
click on the photo again to get into the edit screen, which has a darker background.
 Once you are in the editing section you will notice it says 'creative kit' at the top as highlighted above.
If you click there you are taken into the main editing centre.
Be warned this can take a while to load!

Once the creative kit has loaded, you will instantly recognise the options as being similar to picnik.

With the basic edits, crop, rotate, exposure, colours, sharpen and resize all there which do the same as in picnik, and Effects, Decorate and Text options along the top it really is very similar indeed.
Seems as I am showing you how to select colour removal, you need to get to the Black and White edit via the Effects Tab.

There you will find alot of the familiar edits from Picnik, and when you select the Black and White option the Effects Painting Menu pops out.
To recolour in a selected area, use the effects painting options, set to Original. Pick a brush size using the slider bar, then simply click and drag over the photo on the area you wish to paint back in colour.

The Zoom slider is positions in the bottom right corner to help with the detail and the undo is positioned at the top right incase you make a mistake!
Once you have painted back in the colour where you want it, you must remember to click Apply on the left.

Then you can continue to edit with some of the other options, add text via the Text option along the top or simply save the photo via the blue bottom on the top right. When you are ready to save, it will bring up a couple of options, one to save as a new image and one to over write the original photo on google+

If you choose to save as a new image it will add the edited photo to the album with the original photo in.
Then you can click back onto the photo, back into the first Editor Screen with the dark background

If you look below the photo to the left, you will see 'options' if you click on this a menu pops up here you can choose to either download the photo to your computer, check the photo options (which will appear to the right which tell you when the photo was taken, on which camera etc) or delete the photo.
And that's it you have successfully made a selective colour removal photo.
I hope this is of some use to you. Please feel free to ask any questions and check out my other tutorials in the PhotoStudio.
They told all users to find the edits available on Google+ but I was reluctant to go over to Google+ to try them, I find Google+ very confusing, and I don't really have the time or inclination to suss it out.
But with April 19th drawing closer and not being able to find a simple free photo editor to the same standard as Picnik anywhere I thought I best go and check out what Google + has to offer.
I logged into My account and fumbled around for a while, then eventually found the creative kit, and it is indeed very similar to the much loved Picnik. There are a few differences, no frames as yet and a couple of the other options are unavailable, but Google did promise they would be making the editing features even better in Google Plus so we'll have to wait and see.
Whilst I did not want to be forced into using Google+ it does seem that it may be workable.
There are several features to beable to make your photos private or to share them with your circles, you can also download the edited photos to your computer easily.
So seems as one of the most popular tutorials I made for Picnik was how to get selective colour removal, I have put together this run through for Google +

Those of you who loved and were familiar with Picnik will find it very straight forward once you have worked out how to upload photos into the creative kit.
Ok so Start off by logging into Google+ and you will be greeted with the following screen, along the top there are a set of little icons, one resembling a house, another a photo etc (to see any of the photos in this tutorial larger please click on them)

To upload a photo onto google+ click on the photo icon as shown above and you will be brought to a page where you can view your albums or create a new album and upload photos from your phone or computer, down the left hand side you will see the option to view your albums as highlighted below.

If you wish to upload a new photo select Upload New Photos, from the top right corner as highlighted above.
Then you will see the upload box, where you can select the name of the album you wish to create, or select to add photos to an existing album

Once you have uploaded your photos, and you can see them in your album list, click on the photo you wish and it will be displayed bigger,

click on the photo again to get into the edit screen, which has a darker background.

If you click there you are taken into the main editing centre.
Be warned this can take a while to load!

Once the creative kit has loaded, you will instantly recognise the options as being similar to picnik.

With the basic edits, crop, rotate, exposure, colours, sharpen and resize all there which do the same as in picnik, and Effects, Decorate and Text options along the top it really is very similar indeed.
Seems as I am showing you how to select colour removal, you need to get to the Black and White edit via the Effects Tab.

There you will find alot of the familiar edits from Picnik, and when you select the Black and White option the Effects Painting Menu pops out.
To recolour in a selected area, use the effects painting options, set to Original. Pick a brush size using the slider bar, then simply click and drag over the photo on the area you wish to paint back in colour.

The Zoom slider is positions in the bottom right corner to help with the detail and the undo is positioned at the top right incase you make a mistake!
Once you have painted back in the colour where you want it, you must remember to click Apply on the left.

Then you can continue to edit with some of the other options, add text via the Text option along the top or simply save the photo via the blue bottom on the top right. When you are ready to save, it will bring up a couple of options, one to save as a new image and one to over write the original photo on google+

If you choose to save as a new image it will add the edited photo to the album with the original photo in.
Then you can click back onto the photo, back into the first Editor Screen with the dark background

If you look below the photo to the left, you will see 'options' if you click on this a menu pops up here you can choose to either download the photo to your computer, check the photo options (which will appear to the right which tell you when the photo was taken, on which camera etc) or delete the photo.
And that's it you have successfully made a selective colour removal photo.
I hope this is of some use to you. Please feel free to ask any questions and check out my other tutorials in the PhotoStudio.
Easter Crafting - The unconventional Way!
I joined Pinterest last night, and was met with a sea of beautiful images, lots of amazing crafty ideas and elegant photography, beautiful Easter bonnets and craft ideas, bright coloured paper and pretty designs galore!
So met with a new found inspiration, and pastel coloured beauty in my mind, we set about making our own Easter Bonnets!

We set out a lovely display of pinks, purples blues and yellows the subtle colours that instantly remind you of spring! Pipe cleaners, crepe paper, pompoms and googly eyes a plenty, glitter glue pens and craft glue to make the wonderful visions come to life.
I would consider myself quite artistic, I love to draw and take photos, I love to edit them on the computer and make beautiful designs but when it comes to hands on crafts, with scissors and glue I'm not the best. So for the sake of every ones sanity I cheated and brought plain bonnets to decorate.

Chloe adores all things paper and glue like, never really managing to make anything worthy of grandeur but she does enjoy snipping the PVA pieces into even smaller shapeless pieces, and covering everything in arms reach with splodges of glitter glue - which is it just me, or is that stuff simply not that sticky?!
 Anyway, we got on with the decorating, trying hard to encourage creativity in a way I could display proudly to be in line with the beauty on Pintrest. What about making a Rabbit? or a Duckling? or how about pipe cleaner flowers?

But it is so much harder than it looks! with the unsticking glitter glue covering everything and the input of many little hands our Easter Bonnet finally was finished!

It may not be uniformed in design, or marvel the great prize winning bonnets displayed with pride on pinterest but it provided us alot of fun!
We have made a new Easter bonnet this year you can find that post here: Quick and Easy Easter Bonnet Craft
So met with a new found inspiration, and pastel coloured beauty in my mind, we set about making our own Easter Bonnets!

We set out a lovely display of pinks, purples blues and yellows the subtle colours that instantly remind you of spring! Pipe cleaners, crepe paper, pompoms and googly eyes a plenty, glitter glue pens and craft glue to make the wonderful visions come to life.
I would consider myself quite artistic, I love to draw and take photos, I love to edit them on the computer and make beautiful designs but when it comes to hands on crafts, with scissors and glue I'm not the best. So for the sake of every ones sanity I cheated and brought plain bonnets to decorate.

Chloe adores all things paper and glue like, never really managing to make anything worthy of grandeur but she does enjoy snipping the PVA pieces into even smaller shapeless pieces, and covering everything in arms reach with splodges of glitter glue - which is it just me, or is that stuff simply not that sticky?!


But it is so much harder than it looks! with the unsticking glitter glue covering everything and the input of many little hands our Easter Bonnet finally was finished!

It may not be uniformed in design, or marvel the great prize winning bonnets displayed with pride on pinterest but it provided us alot of fun!
We have made a new Easter bonnet this year you can find that post here: Quick and Easy Easter Bonnet Craft
How to remove a photos Background
If you have looked at my Basic Paint Shop Pro Tutorial found here and mastered the features I explained in this tutorial, crop, resize and making a new image, then you may be looking for how to increase your creativity.
So This tutorial will show how to cut out a section from a photograph and remove the background. To see the images full size please click on them.

The program I am using is Paint Shop Pro version 7, but many photo editing software packages work on very similar principles.
Right, so start off by opening the image you wish to work with, into Paint Shop Pro, (use the File option along the top)
Then look at the tool menu down the left hand side, and you will see a lasso shaped icon. This is the selection tool. If you click on the Lasso icon, then look over at the tool options you will see a 'selection type' drop down menu if you click the little arrow, you will see three options, freehand, point to point and smart edge.

The option I use is point to point as I find this works the best, so select that from the list. You will also notice there is a 'feather' option. This effects how much blur you wish for your cut out edge to have, if you want a very sharp clean cut select the feather to 0, if you want are cutting out people it is normally good to have a slight feather, I normally select around 3. Try what suits you best.
Once you have the tool selected, click at a point on your subject you wish to cut out, then continue to click around the edge of the area you wish to cut out, moving the mouse to each point, as if you were making a dot to dot. (Be careful not to double click on any point as this will finish your selection)

Once you have clicked point to point around your subject, double click to finish the selection process, and your end point will join up t the starting point, you will then see marching ants highlight around your cut out area, if you are happy with the position of the selection then you can 'cut out' your subject.

To do this go to Edit on the Top menu bar, and select 'cut'
Then you will see the selected area removed, and normally a yellow background is visible instead.

Now you want to put your cut out selection into its own new image, so go to Edit again along the top menu bar, and this time select Paste, then 'Paste As New Image' and your selection will be pasted onto a new image.

You can now close your original Photo, by using the red cross in the top right hand corner of the image.

But Please note to select NO when it asks if you would like to save changes, otherwise you will save over your original photo on your hard drive with a yellow cut out!
Now you have a new image with the background removed, you can use the basic shape maker tool to add a plain background if you wish, and use your new cut out photo to incorporate into any designs.

Hope this is some help, if you have any questions please feel free to ask and I'll do my best to answer them.
So This tutorial will show how to cut out a section from a photograph and remove the background. To see the images full size please click on them.

The program I am using is Paint Shop Pro version 7, but many photo editing software packages work on very similar principles.
Right, so start off by opening the image you wish to work with, into Paint Shop Pro, (use the File option along the top)
Then look at the tool menu down the left hand side, and you will see a lasso shaped icon. This is the selection tool. If you click on the Lasso icon, then look over at the tool options you will see a 'selection type' drop down menu if you click the little arrow, you will see three options, freehand, point to point and smart edge.

The option I use is point to point as I find this works the best, so select that from the list. You will also notice there is a 'feather' option. This effects how much blur you wish for your cut out edge to have, if you want a very sharp clean cut select the feather to 0, if you want are cutting out people it is normally good to have a slight feather, I normally select around 3. Try what suits you best.

Once you have clicked point to point around your subject, double click to finish the selection process, and your end point will join up t the starting point, you will then see marching ants highlight around your cut out area, if you are happy with the position of the selection then you can 'cut out' your subject.

To do this go to Edit on the Top menu bar, and select 'cut'
Then you will see the selected area removed, and normally a yellow background is visible instead.

Now you want to put your cut out selection into its own new image, so go to Edit again along the top menu bar, and this time select Paste, then 'Paste As New Image' and your selection will be pasted onto a new image.

You can now close your original Photo, by using the red cross in the top right hand corner of the image.

But Please note to select NO when it asks if you would like to save changes, otherwise you will save over your original photo on your hard drive with a yellow cut out!
Now you have a new image with the background removed, you can use the basic shape maker tool to add a plain background if you wish, and use your new cut out photo to incorporate into any designs.

Hope this is some help, if you have any questions please feel free to ask and I'll do my best to answer them.
Thursday, 22 March 2012
Digital Scrapbooks
Many years ago I came across a version of a photo editing software called Paint Shop Pro, I opened it up and started to have a play around with it, not really knowing much about what you could or couldn't do on this software I decided the best way to learn what was achievable was to jump in and try things out!
Slowly I learnt some basic cut out techniques and loved playing around layering photos ontop of each other, adding a dash of text and getting creative, my simple designs started to become more elaborate and I was increasingly impressed with my efforts.

I was unaware of the huge world of digital scrapbooks and was just happy to be able to manipulate my photos in such a creative way. Being self taught I was happy in my own bubble playing around with my personal photographs.
Then I went searching online for some inspiration, help and tutorials for paint shop pro and found I was experimenting making what some people call 'tags' or 'signatures' which are little pictures you can tag onto the end of an email, or place in your signature box on forums.
I joined a online forum and met some amazing ladies who showed me the ropes and helped me improve.
I became a designer on the website and loved making these signatures for other people.
Then as the time went on this forum closed, but I stayed friends with the wonderful women who had taught me so much.

They spread their wings and started exploring the world of digital scrap booking, very much like the traditional scrapbook, but instead of collecting together bits and pieces, craft materials, textured paper and keep sakes which you combine to make a real scrapbook page, you instead can purchase digital scrap kits.

These are virtual kits made up of digital papers and elements, which can be opened into editing software such as paint shop pro, and used to help you create simply amazing artistic designs on your computer.
These scrap kits come in 1000's of different designs but you can find one that is themed to match any photograph you would like to incorporate, and whilst they help you to make wonderful signatures many people like to make a larger page design, more traditional scrapbook sized.
There are some truly stunning designers around and their work is so beautiful it's hard to describe in words alone. take a look at these amazing pages!
I regrettably have not spent very much time dedicated to making scrap pages in the recent months, and am still trying to improve and reach some of the amazing standards of other designers but here are some of my favourites.

If you are interested in learning more about photo editing and digital scrap kits please take a look at my photo studio found here, I have a simple tutorial for getting started in paint shop pro. I will be adding to this section in the not to distant future with some more tips on the more creative edits and scrapbook techniques.

Slowly I learnt some basic cut out techniques and loved playing around layering photos ontop of each other, adding a dash of text and getting creative, my simple designs started to become more elaborate and I was increasingly impressed with my efforts.

I was unaware of the huge world of digital scrapbooks and was just happy to be able to manipulate my photos in such a creative way. Being self taught I was happy in my own bubble playing around with my personal photographs.
Then I went searching online for some inspiration, help and tutorials for paint shop pro and found I was experimenting making what some people call 'tags' or 'signatures' which are little pictures you can tag onto the end of an email, or place in your signature box on forums.

I joined a online forum and met some amazing ladies who showed me the ropes and helped me improve.
 |
| Kit used: Delicate Garden by Fanette Designs |
I became a designer on the website and loved making these signatures for other people.
 |
| heres a signature I made for myself showcasing some of the tags I'd made whilst on the forum using the 'Like an artist' kit by MD designs |

They spread their wings and started exploring the world of digital scrap booking, very much like the traditional scrapbook, but instead of collecting together bits and pieces, craft materials, textured paper and keep sakes which you combine to make a real scrapbook page, you instead can purchase digital scrap kits.

These are virtual kits made up of digital papers and elements, which can be opened into editing software such as paint shop pro, and used to help you create simply amazing artistic designs on your computer.
 |
| Kit credit to Sun Sea and Vacations by Ptitesouris Designs |
These scrap kits come in 1000's of different designs but you can find one that is themed to match any photograph you would like to incorporate, and whilst they help you to make wonderful signatures many people like to make a larger page design, more traditional scrapbook sized.
 |
There are some truly stunning designers around and their work is so beautiful it's hard to describe in words alone. take a look at these amazing pages!
I regrettably have not spent very much time dedicated to making scrap pages in the recent months, and am still trying to improve and reach some of the amazing standards of other designers but here are some of my favourites.
 |
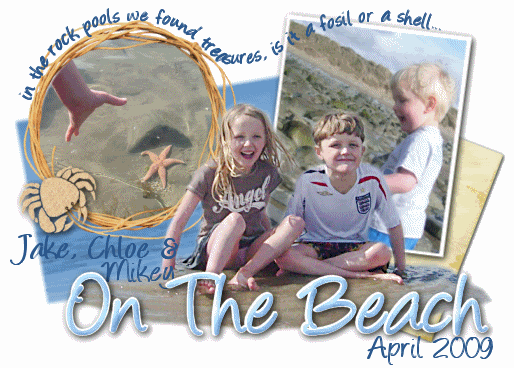
| Precious Moments : Kit used Precious Ones by VeraLim Designs |
 |
| Kit used Fishercat by Shyarka Designs |

If you are interested in learning more about photo editing and digital scrap kits please take a look at my photo studio found here, I have a simple tutorial for getting started in paint shop pro. I will be adding to this section in the not to distant future with some more tips on the more creative edits and scrapbook techniques.

Subscribe to:
Posts (Atom)